Project Overview
In 2016, I designed and built my first 3D printer completely from scratch. At that time, 3D printing was starting to become popular, but commercial printers were very expensive and limited, especially for a student. I wanted a 3D printer to experiment and learn, but buying one was not an option, so I decided to build my own.
 Me with the 3D printer.
Demo video.
Me with the 3D printer.
Demo video.Motivation
The main motivation behind this project was simple: I wanted a 3D printer and I could not afford one.
At that time, 3D printing was growing thanks to the RepRap open-source movement, which promoted self-replicating and DIY 3D printers. While researching how commercial printers worked, I realized that many of them were based on the same RepRap ecosystem: Marlin firmware running on an Arduino Mega with a RAMPS board.
Since I was already programming and building small projects with Arduino, it became clear that the technology used by commercial printers was accessible. Instead of buying an expensive closed solution, I decided to build my own RepRap-style 3D printer from scratch.
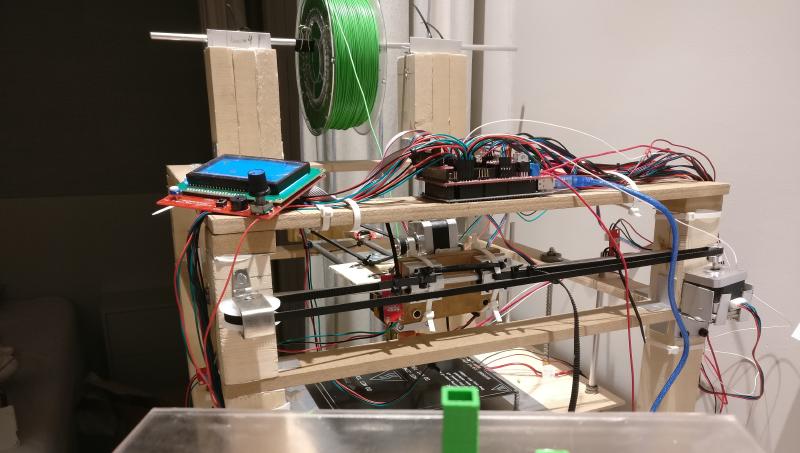
Hardware and Mechanical Design
The printer was built using:
- an Arduino Mega
- a RAMPS 1.4 shield
- Pololu A4988 stepper drivers
- NEMA 17 stepper motors for all axes and extruders
The mechanical structure was designed and built by me using wooden frames, which I calculated, cut, and assembled manually. I used timing belts and pulleys for motion control, following RepRap-style designs.
Everything was assembled and adjusted by hand, from the frame alignment to belt tension and axis calibration.
Firmware and Calibration
The printer ran Marlin firmware, which I configured and modified to match my hardware setup.
I spent a significant amount of time:
- configuring motor directions and steps per millimeter
- calibrating PID control for the heated bed and hotend
- tuning temperature stability and motion behavior
This was my first deep contact with embedded firmware, understanding how software directly controls physical systems.
Before printer calibration.First Steps in 3D Printing Software
This project was also my first real experience with 3D modeling and the RepRap software ecosystem.
I learned how early 3D printing workflows worked, including:
- generating G-code manually
- configuring slicers like Slic3r
- understanding how RepRap firmware interprets motion and temperature commands
At that time, many parameters had to be tuned manually, and tools were far less automated than today. This forced me to understand how printing speed, temperatures, layer height, and extrusion settings affected the final result.
First printing tests.Time and Effort
This project took a long time to complete. I worked on it while going to school, advancing slowly but consistently. Progress often came in small steps: assembling, testing, breaking things, fixing them, and trying again.
It was not a fast project, but it was a very complete one.
Why This Project Matters
This was my first experience with 3D printing, 3D modeling, and understanding how additive manufacturing works at a low level.
More importantly, it was one of the first projects where I combined:
- electronics
- mechanics
- firmware
- software tools
into a single working system. It strongly influenced my interest in building complete systems and understanding technology from the inside.